
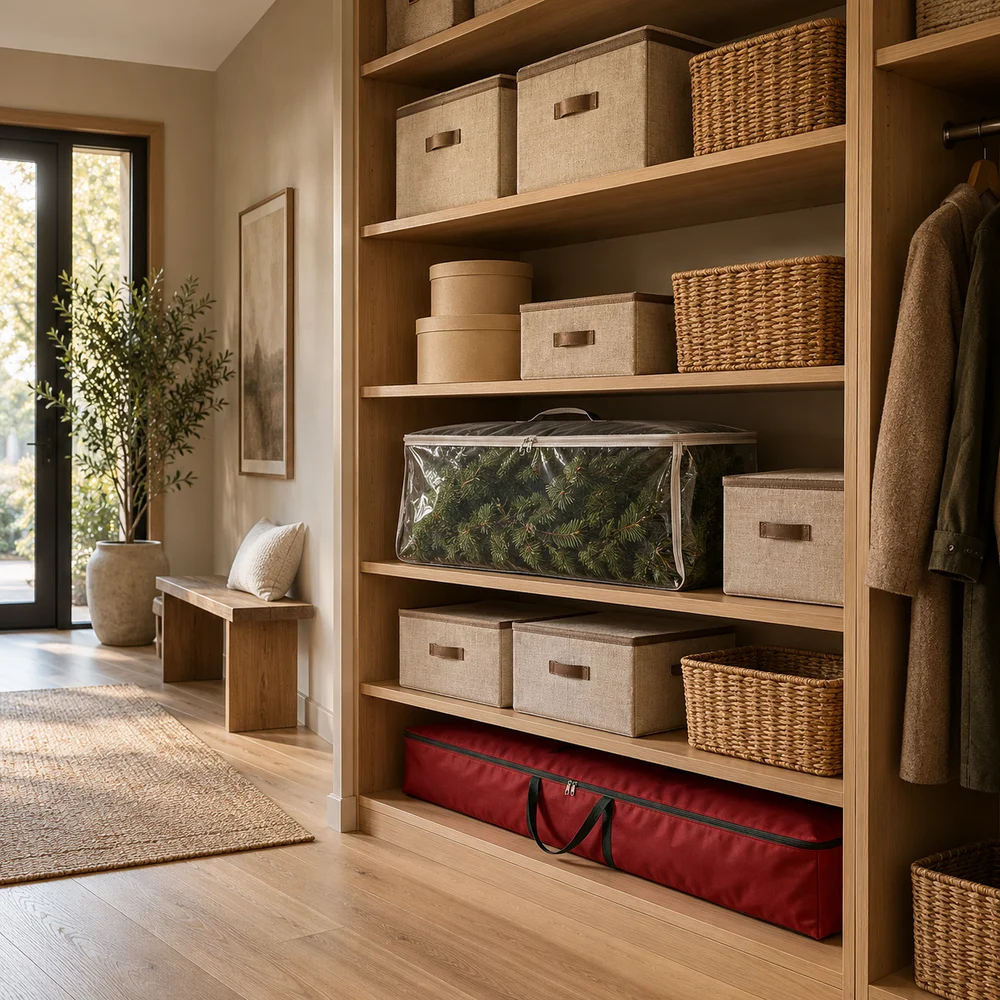
How to Pack Away Christmas Decorations the Smart Way
By HomeStyledLiving | October 28, 2026
The decorations come down much faster than they went up. The tree has been shedding for a week, the house feels oddly large and a little flat, and the quickest way to be finished is to drop everything into whichever box is nearest. That choice takes about ten minutes to make and is paid for months later, when the lights come out in one knot, a favourite ornament has a crack across it and the wreath has been pressed into an oval.
Packing away is the other half of decorating. How things go into storage decides how they look when they come out again, and it decides how much effort next December asks of you before a single bauble is hung. A decoration that is protected from crushing, dust and tangling is one you will want to use again, and the protection does not have to be elaborate.
This guide works through eight kinds of Christmas decoration, one at a time: ornaments, wreaths, the tree, wrapping supplies, lights, figurines, garland and the paper rolls that never seem to fit anywhere. Each section pairs the decoration with a container shaped for it and explains why the shape matters. You do not need every one. Start with whatever is hardest to replace or most irritating to untangle, and add from there.
One habit comes before all of it: decide what earns a place in storage. Anything broken, anything you did not unpack this year and anything you only keep out of guilt can leave the house now, and the boxes you do pack will be smaller, lighter and easier to find. Where a listing gives a size or a capacity, this guide repeats it as the listing states it, and it is worth checking against your own decorations before you buy.
1. Give Every Ornament Its Own Compartment
 Save it
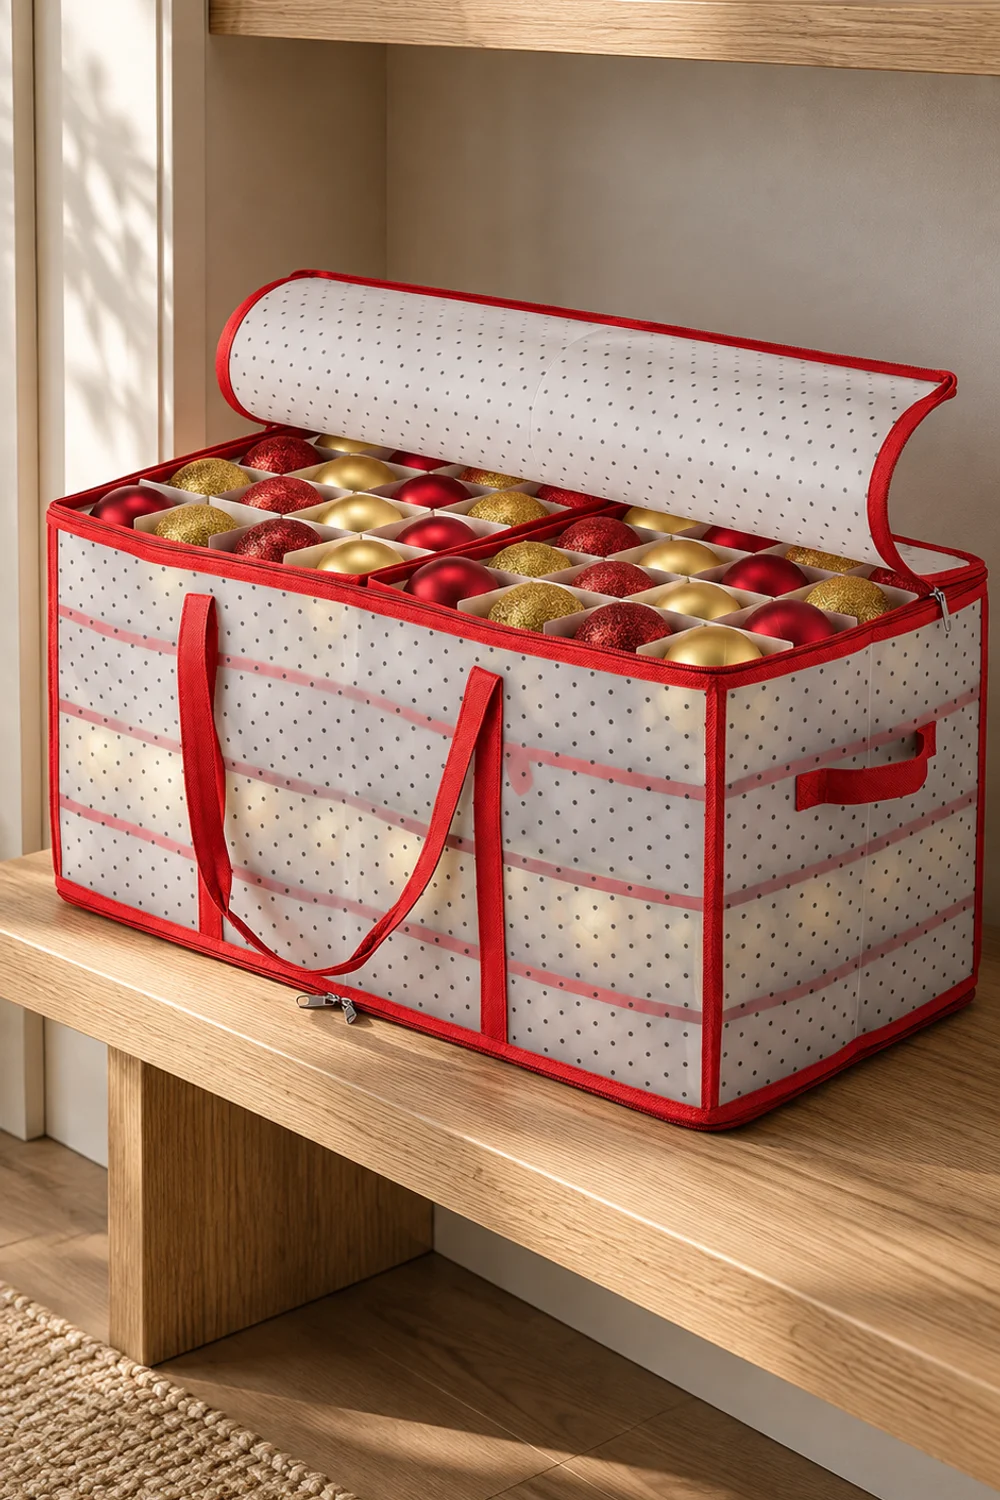
Ornaments rarely break because they fall. They break because they are pressed against each other, so in a box of loose baubles the weight of the whole box ends up on the ones at the bottom. A compartment for each ornament reverses that: every piece carries only itself, a closing lid has nothing to crush, and unpacking next year means lifting out a tray instead of digging through tissue.
An ornament box is built on that idea. It stores 128 three-inch ornaments in cube compartments, and according to the listing the compartments are held by trays rather than cardboard inserts, with adjustable slots so you can fit the number of ornaments to each cell. A two-sided zipper opens the lid wide, and a card slot on the outside lets you write what is inside. The body is a translucent white with a dotted pattern and red binding, and the listing describes the fabric as water-resistant and tear-proof.
Notice the size in the name: the compartments are for three-inch ornaments. Measure your largest and most delicate pieces before you decide which ones go in, because a ball that is forced into a cell is no safer than one lying loose. Oversized or oddly shaped ornaments need their own wrapping and a separate spot, and a soft layer of tissue around anything hand-painted or glass is cheap insurance.
Fill the trays with the heavier ornaments at the bottom and the lightest on top, keep the hooks in a small bag so they do not scratch the finish, and use the card slot properly. “Tree ornaments, red and gold” tells next year’s you exactly what the box is, and the same note saves a search when you are looking for a single missing piece.
Choose this when you own a lot of standard ornaments and want them to come out looking exactly as they went in. If most of your collection is shatterproof or very large, a simpler container may be enough.
2. Keep Wreaths Round in Clear, Zippered Bags
 Save it
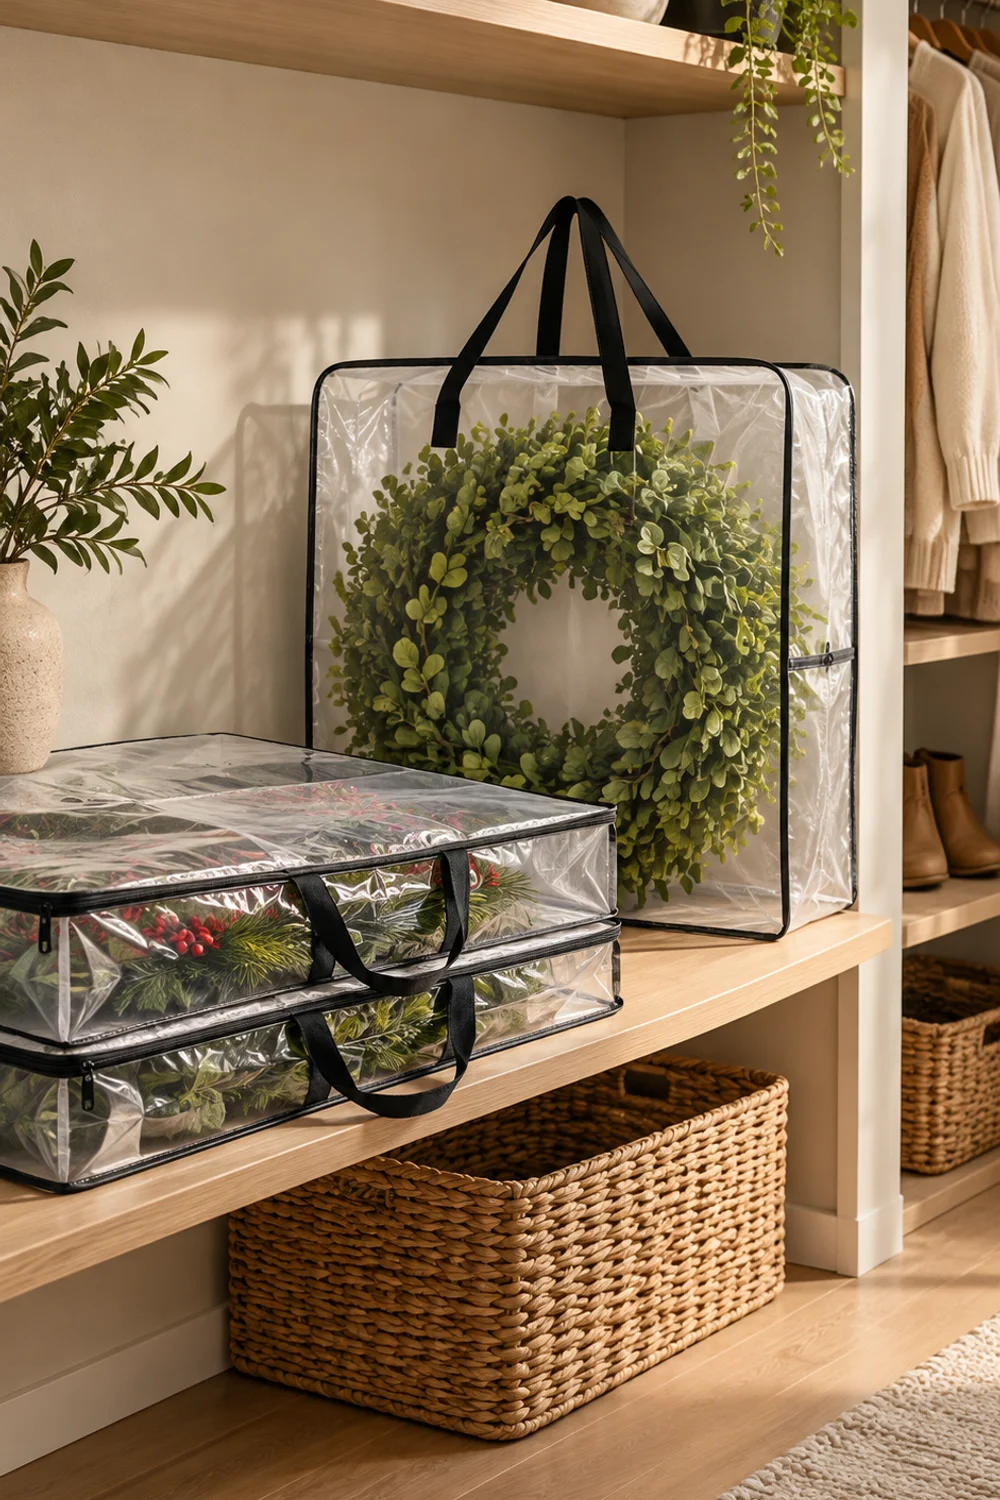
A wreath is one of the easiest decorations to ruin in storage. It is wide, flat and full of stiff needles, so anything stacked on top flattens the circle, and needles that are bent for eleven months tend to stay bent. The aim is to give it a rigid-feeling, protected space of its own, where nothing sits on it and you can see what it is.
This wreath pack of five clear bags is a practical way to do that. Each bag measures 25.6 inches square and 8.7 inches deep according to the listing, which also calls them 30-inch wreath bags, so measure your wreath across, bow included, against 25.6 inches before you rely on the larger number. The material is described as water-resistant woven polypropylene, a three-sided zipper opens the bag wide, the bag stands upright and has two handles, and the listing states a load limit of 50 pounds.
Clear matters more than it sounds. When you can see the wreath through the bag, you do not open three to find the right one, and you are less likely to lean something heavy on a bag that looks as if it holds a wreath. Pack one wreath per bag, remove any loose ribbons or detachable bows and store them separately, and fluff the branches back into shape before the zipper closes.
Keep the bags upright or hanging, never at the bottom of a stack. The pack of five also leaves you with spare bags, and the listing suggests uses beyond wreaths, such as cushions and bedding, which makes the extras easy to put to work once the season is over.
Choose this when you have several wreaths of different styles, or one large front-door wreath that you want to keep in good shape. If your wreaths are larger than the bag’s measurements, look for a container sized to them instead.
3. Put the Tree Away in One Heavy-Duty Bag

 Save it
An artificial tree almost never fits back in its original box. The cardboard is crushed by the first season, the branches have been fluffed to a volume the box was never designed for, and the whole thing ends up wrapped in a bin bag or leaning in a corner under a sheet. A purpose-made bag solves the problem by being larger, tougher and easier to carry than the box ever was.
The tree bag is listed for trees up to nine feet tall and is made from 600D fabric with reinforced handles and a zipper closure. The listing describes it as waterproof and says it is suitable for garlands, lights and ornaments as well, and the bag shown has a clear label window on the side. In red with black handles, it is easy to spot on a shelf and hard to mistake for anything else.
Take the tree down in the order that protects it. Remove every ornament first, unplug and tuck cords against the section they belong to so they are not dragged through the branches, and fold the branches down along the pole before the sections go in. Put the stand screws and any fittings in a labelled bag and slide it inside the bag with the tree, because those small pieces are the ones that disappear.
A nine-foot tree in a bag is a long, awkward load, so plan the route from the living room to the storage spot before you lift it. A tree that you will use for many years deserves proper storage, a point that comes up in How to Decorate Every Room for Christmas Without Overspending, where the tree is treated as a long-term purchase rather than a seasonal one.
Choose this when your tree has outgrown its box, or when you simply want a single container that holds it and its small parts. If your tree is shorter, check that the bag is not so large that it leaves the sections free to shift.
4. Build a Wrapping Station That Slides Under the Bed
 Save it
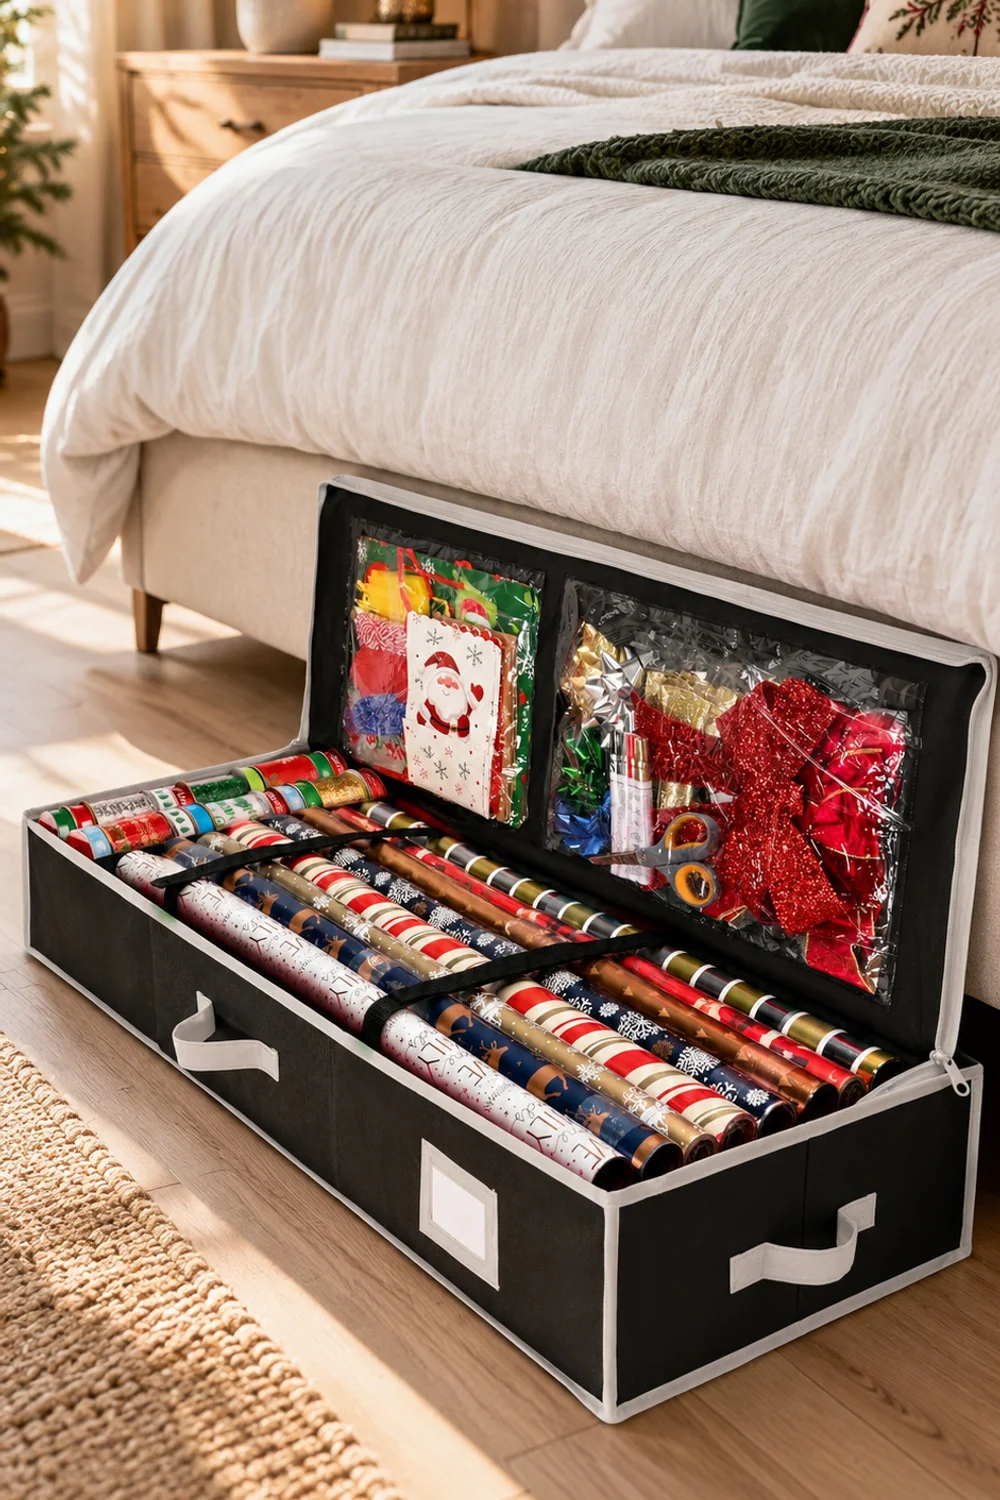
Wrapping supplies are the decoration nobody plans to store. Rolls end up in a bag in the hall cupboard, ribbon is in a drawer, tape and scissors are wherever they were last used, and the first night of wrapping begins with a search. A flat organizer solves that by holding the paper, the ribbon and the tools in one place that has a home of its own.
This wrapping paper organizer measures 40 inches long, 14 wide and 6 high, which is the shape of the gap under many beds. It is made of tear-proof polyester with white piping and handles, and a zippered lid opens to show two clear pocket panels, ideal for bows, gift bags and ribbon. The listing says it holds 24 standard rolls up to 40 inches long, although the title mentions 27, so plan around the lower number. A side pocket is described for scissors and tape.
Under-bed storage only works if the bed has the clearance, and it is worth measuring the gap before ordering. Bedroom storage under the bed is covered in more detail in Small Bedroom Organization Ideas That Instantly Free Up Space, including how to choose what lives there and what does not.
Lay the rolls in side by side, tape each loose end so the paper does not unroll in the dark, and sort the pockets by use: ribbon in one, bows and tags in another, the scissors and tape in the side pocket. Those two tools staying with the paper is the whole point. Next year the station is ready to open and use, without anything to find.
Choose this when you have enough paper to need a real system and a bed or sofa with a gap beneath it. If your supply is small, you may need nothing more than the tube in the last section.
5. Wind Lights Onto Reels Before They Knot
 Save it
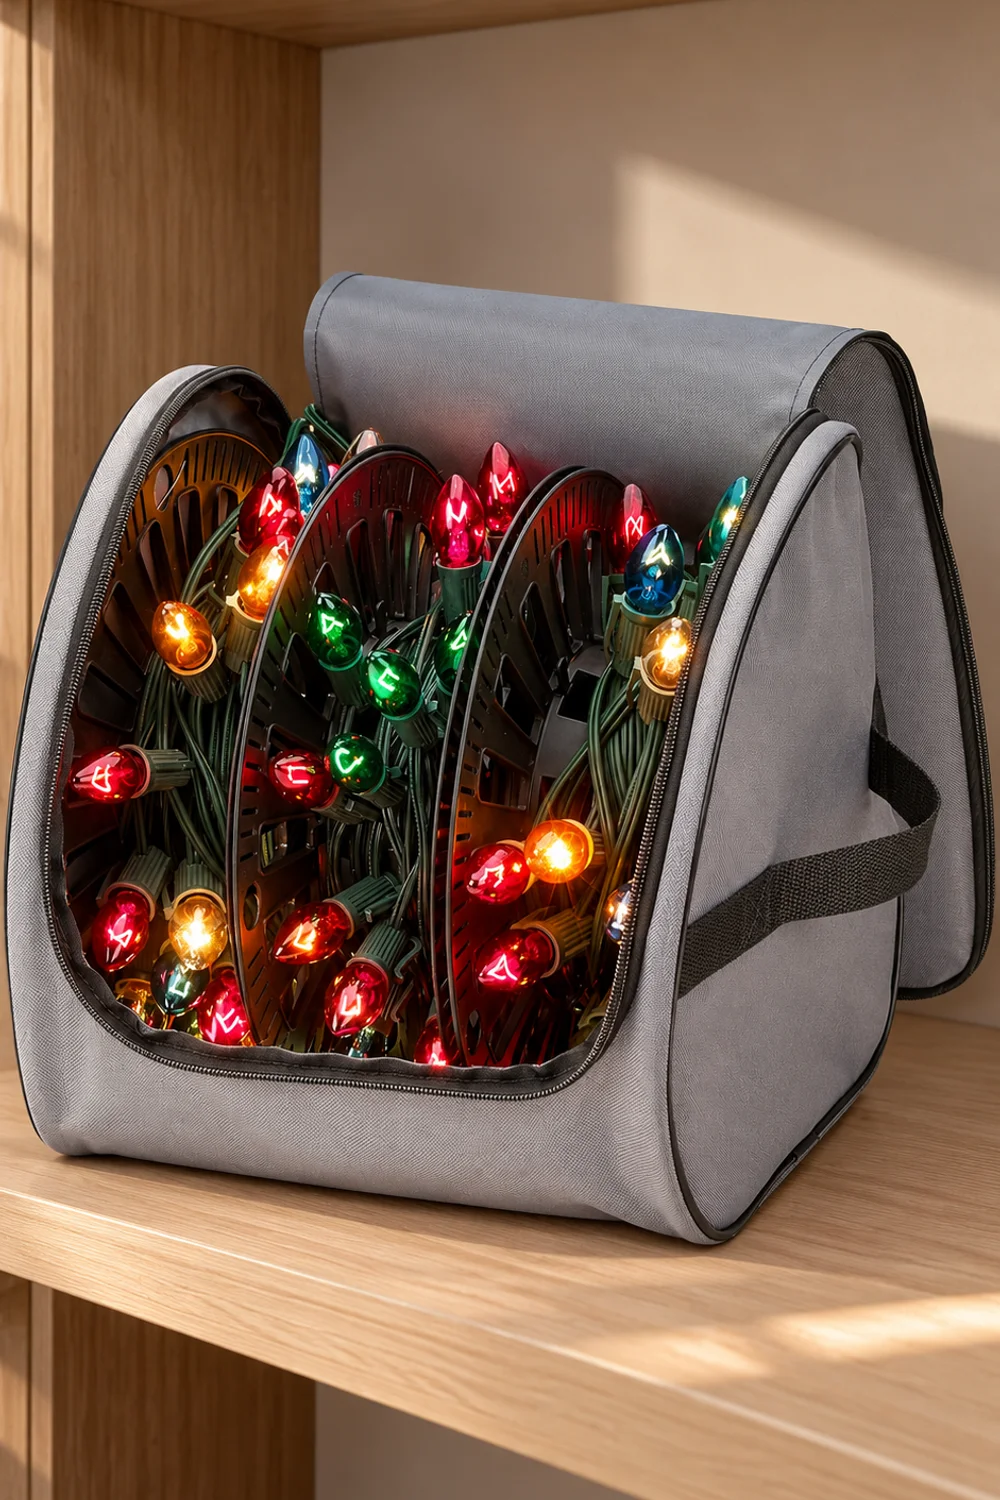
String lights tangle because they are loose loops with a plug on one end and a socket on the other, and any two loops will find each other in a box. The cure is a single path: wind each strand onto something, in one direction, and keep it there. A reel does that more reliably than hands do, and it means that next year you unwind the lights, not untie them.
This light bag holds three spinning reels in a rounded grey bag. According to the listing, each reel holds up to 150 feet of wire, which the listing translates as 125 feet of mini lights, 150 feet of extension cord or 75 feet of C7 bulbs, and a clamp included in the set attaches a reel to a ladder or gutter for hanging outdoors. The bag opens with a wide U-shaped zipper, has a clear ID label and reinforced handles, and collapses flat when it is empty.
Test every strand before it is wound, not after. Plug each one in while it is laid out on the floor, and any that are dead can be repaired or thrown away now rather than being stored for another year. Start winding from the end without the plug so that the plug end, the one you need first, comes off last, and keep one type of light on each reel so the label tells you what is inside.
Avoid winding lights when they are damp or still warm from the tree, and do not pull the wire tight against the reel. Smooth, even turns are what let a strand come off in a single run, and they are much easier to make when the lights are not fighting you.
Choose this when you own several strands, especially long ones, or a mix of indoor lights and extension cords. For one or two short strands, a smaller container may be more than enough.
6. Give Nutcrackers and Figurines Their Own Dividers
 Save it
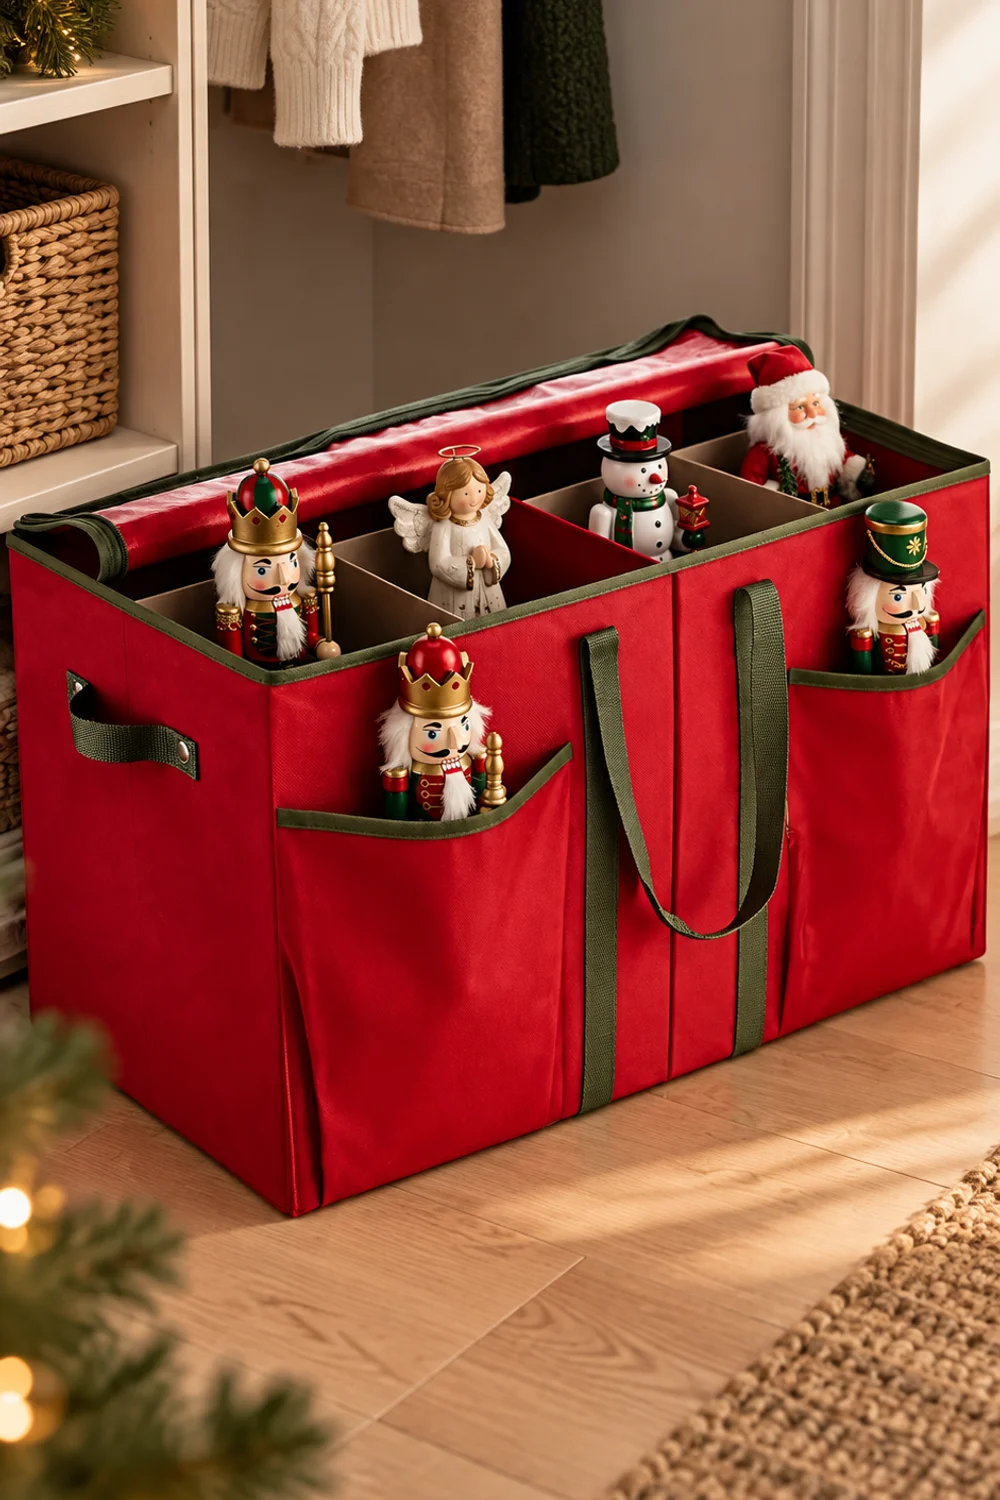
Tall figures break at their weakest points: a raised arm, a sword, a hat. In a box of mixed decorations they are knocked sideways, and one hard bump is all it takes to lose a piece that cannot be replaced. What they need is to stand upright, apart from one another, with something soft against the fragile parts.
A figurine container stores up to eight figures of up to 15 inches each, with cardboard dividers between them. The listing describes the cover as breathable non-woven fabric that protects from moisture, with handgrips at both ends, extra outside pockets and a card slot. The box shown is red with olive-green binding and a central carry strap.
Wrap each figure in tissue or a clean soft cloth before it goes into its cell, paying most attention to anything that sticks out. Keep detachable pieces, such as a nutcracker’s sword or a small staff, with their figure, either wrapped alongside it or in one of the outer pockets. Use the card slot to note what is inside, because once the lid is closed every figure looks the same.
Measure your tallest piece against the listing’s 15 inches, and the base against the width of a cell, before you count on the number eight. Small homes tend to display a handful of figures together instead of a crowd, the approach behind How to Make a Small Space Feel Festive for Christmas, and the same restraint makes the storage smaller too: a few pieces you love need a small box, not a large one.
Give the heaviest figures the cells nearest the handles, so the box tilts less when you carry it, and keep a spare square of tissue in the pocket for next year, because the original wrapping rarely survives. Choose this when you have collected figures over the years or have inherited a few. If your decorations are mostly small and unbreakable, a simple box may be enough.
7. Lay Garland Flat in a Long Bag With Straps
 Save it
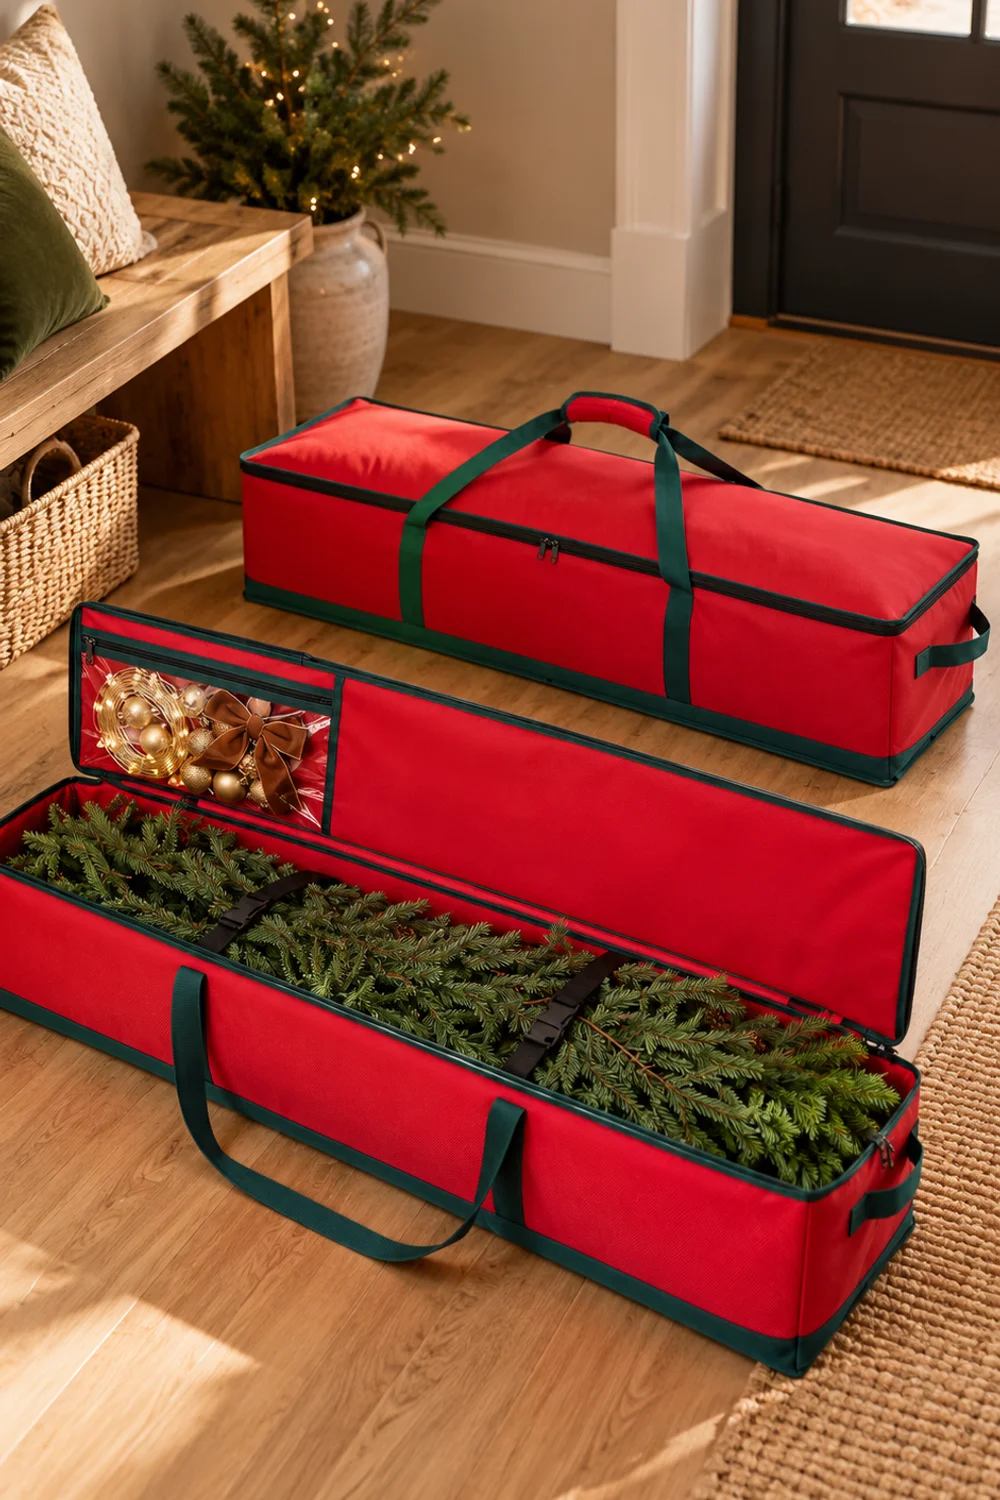
Garland is a long, shapely thing that does badly when it is squashed. Coiled into a ball or stuffed in a box, the wire kinks, the tips bend and the stems shed; laid flat and kept that way, it stays much as it was bought. The right container is therefore long and narrow, with something to hold the garland still.
This two-pack of garland bags gives you two containers, each about 50 inches long and 10 inches high and wide, according to the listing. They are made from 600D oxford fabric, with dual zippers that open wide, reinforced handles and a transparent label window. The detail that matters for garland is inside: buckle straps that hold the lengths in place so they do not slide or twist, and a mesh pocket in the lid for cords, hooks and light controllers.
Lay the garland in side by side, fold it back at a natural bend instead of across the wire, and fasten the buckles over it without pulling them tight. If the garland carries lights, switch them off and coil the cord neatly before it goes in, and use the mesh pocket for the battery pack, the timer or the loose hooks that go with it. Those small parts are exactly what goes missing.
Use one bag for each location where a garland hangs, for instance mantel and staircase, so that next year you take out what you need and leave the rest. Check the length against the listing first: a garland much longer than 50 inches has to be folded, and that is fine, but the folds should land at bends, not at the middle of a thick section.
Choose this when you have one or more long garlands that you want to use again next year. If you have only a short swag, a wreath bag or a corner of the tree bag may do the job.
8. Keep Leftover Wrapping Paper Visible in a Clear Tube
 Save it
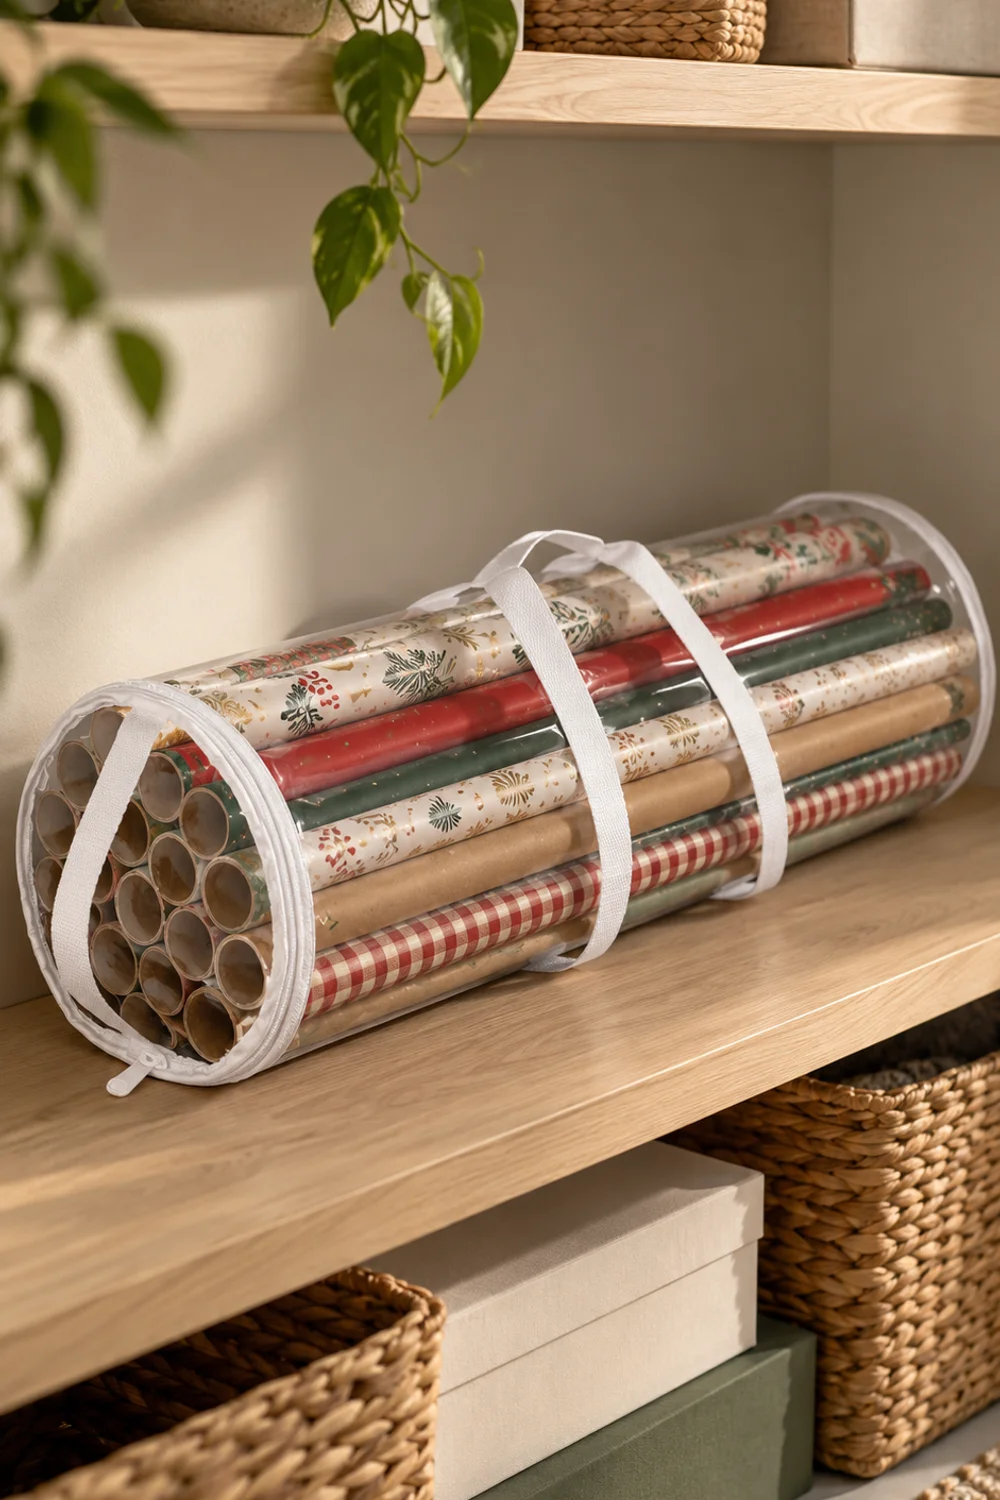
Opaque boxes hide what you own, which is how people end up with five rolls of the same red paper. A clear container shows the colours and patterns at a glance, so you wrap from what you have, and see when something is nearly finished. For rolls, the right shape is a tube: it keeps them upright or flat, protects the ends and takes up a small, tidy line of space.
This gift wrap organizer is a clear zippered tube measuring about 8.74 inches across and 31 inches long, with white binding and two white handles. It holds standard rolls of gift wrap, and the transparency is the point: the paper is protected from dust and creasing, and you can see what you have at a glance.
Sort the rolls by palette, so that everything in the tube works together, and put the ones you use most nearest the opening. Check that your rolls are no wider than the tube’s 31 inches, since wide rolls will not fit. A band of tape or a rubber band on each roll prevents the paper from unrolling inside the bag.
You may not need this and the under-bed station from section 4. They solve the same problem in different ways: the station holds the paper, ribbon and tools in a flat box under a bed, while the tube is a lighter option for a closet, a shelf or the corner of a utility room. If you already have the station, use the tube only for the paper you reach for most and leave the rest below the bed.
Because the tube is clear, it also doubles as a quiet reminder at the start of the next season: whatever is left at the bottom is what to use first, before anything new is bought. Choose this when your wrapping supply is moderate and you want to see it. For a larger collection or one that includes ribbon and tools, the bigger organizer is the better home.
Common Mistakes
1. Packing decorations damp or dusty
Anything put away damp can smell musty by next year, and dust turns into grime in a closed bag. Wipe items down, let them dry fully and pack them when they are clean, especially fabric, greenery and anything that was near a window or a humid room.
2. Using one big box for everything
A single box means heavy items crush fragile ones and nothing is ever found without emptying it. Group by type, pack heavy at the bottom and give breakable things their own space, so that each container has one job and one label.
3. Storing lights without testing them
A dead strand is much easier to deal with now than next December, when it is part of a tree you are trying to finish. Plug in each one before it is wound, and set aside any that need repair so they do not go back into the bag with the working ones.
4. Putting heavy things on wreaths and garland
Anything stacked on a wreath flattens it, and anything stacked on garland bends the wire. Keep these upright or at the top of a pile, never underneath, and give them the shelf that nothing else will be piled on.
5. Skipping the labels
When every bag looks the same, you open each one to find the right one. A short label on the outside, with the contents and the room they belong to, pays back the next time you open them, and it makes it obvious which container is missing when something has been left out.
Frequently Asked Questions
When should I take down my Christmas decorations?
There is no single right date, and customs differ, so choose a time that suits your household. Many people wait until after the New Year; the useful rule is to take everything down in one go, so that nothing is left half-packed.
How do I stop ornaments from breaking in storage?
Give each ornament a place of its own, with dividers or tissue between them, and put the heaviest at the bottom. Do not pack ornaments loose in a box, and keep the box away from anything heavy.
How do I keep Christmas lights from tangling?
Wind each strand onto a reel, a piece of cardboard or a spool in one direction, with the plug end last, and store each in its own space. Test them before you wind so that you are not storing dead strands.
Is it okay to keep decorations in the attic or basement?
Many storage guides advise against places where the temperature changes a lot or where it can get damp, since both are hard on fabric, glue and finishes. A closet, a shelf indoors or the space under a bed is usually gentler, if you have the room.
Do I need to buy all of these containers?
No. Start with what is hardest to replace or most annoying to untangle, usually ornaments, lights or figurines, and add the rest only if you have the items they are made for. A container only helps when it matches something you actually own.
Final Thoughts
A good pack-away is not about perfect boxes. It is about making the next unpacking easier than this packing, so that the tree comes out whole, the lights run straight and nothing that mattered to you has a crack in it. The work is done in an afternoon, and its benefit shows up a year later, when you open one lid and find exactly what you expected. That small certainty, repeated across the tree, the lights and the ornaments, is what turns putting Christmas away from a chore into the first step of next year’s.
You do not need all eight. Choose the two or three decorations that cost you the most trouble last year, give them the right container, and let the rest go in as they did before. Next December you will be glad of every minute you spent on it.
This post contains affiliate links. I may earn a small commission at no extra cost to you. As an Amazon Associate I earn from qualifying purchases.
GET YOUR FREE CHECKLIST
A More Organized Home
Starts Here
Join the community and my free Home Organization Checklist, plus weekly tops and inspiration.
Thank you!
You have successfully joined our subscriber list.